Macroseismic Intensity Data Online Publisher
Uploading data into MySql
Macroseismic data tables must be uploaded to MySql in order to be reachable by MIDOP.
This upload process is crucial: if something goes wrong your data could be affected by some conversion error, so be careful while doing it.
In order to avoid potential problems, please follow these simple rules:
- within the same table do not duplicate field (= column) names;
- in table names and field names avoid spaces, special characters and use always or lower or uppercase characters;
- for each field specify the data format (integer or floating numbers, characters, long text).
If you are new to MySql and, more generally, not familiar with the concepts of a database, keep in mind that:
- a database can contain many data tables;
- each data table may contain hundreds of fields;
- tables can be linked among them by means of unique identifiers called “keys”;
- each field name must be unique among the same table and a can contain only a specific “type” of data;
- the basic naming rule for databases, tables and fields is that a set of characters should be avoided: no spaces, no accented letters, no apostrophe, no commas, no special marks. In addition, try to adopt only lowercase names and if you want to separate words use “_”.
In a database the content of each field must be always declared in advance when you are creating the table. Changing later on the data type of a field is possible, however it may lead to a serious data loss. If for example you have a field declared as “text” and you will change the type to “numerical”, you will loose all the alphabetic characters leaving only numbers.
Below a list of the main MySql data “types”:
| Type | Description |
|---|---|
| VARCHAR (Length) | A fixed-length field from 0 to 255 characters long. |
| TINYTEXT | A string with a maximum length of 255 characters. |
| TEXT | A string with a maximum length of 65,535 characters. |
| MEDIUMTEXT | A string with a maximum length of 16,777,215 characters. |
| LONGTEXT | A string with a maximum length of 4,294,967,295 characters. |
| TINYINT [Length] | Range of -128 to 127 or 0 to 255 unsigned. |
| SMALLINT [Length] | Range of -32,768 to 32,767 or 0 to 65535 unsigned. |
| MEDIUMINT [Length] | Range of -8,388,608 to 8,388,607 or 0 to 16,777,215 unsigned. |
| INT [Length] | Range of -2,147,483,648 to 2,147,483,647 or 0 to 4,294,967,295 unsigned. |
| BIGINT [Length] | Range of -9,223,372,036,854,775,808 to 9,223,372,036,854,775,807 or 0 to 18,446,744,073,709,551,615 unsigned. |
| FLOAT | A small number with a floating decimal point. |
| DOUBLE [Length, Dec] | A large number with a floating decimal point. |
| DECIMAL [Length, Dec] | A double stored as a string, allowing for a fixed decimal point. |
| DATE | In the format of YYYY-MM-DD. |
| DATETIME | In the format of YYYY-MM-DD HH:MM:SS. |
| TIMESTAMP | In the format of YYYYMMDDHHMMSS; range ends in the year 2037. |
| TIME | In the format of HH:MM:SS. |
Table 5. Main MySql field data types.
In this page you may fond some tips on how to upload your data to MySQL.
- First, you should create a database that will contain all of your tables
- Then you should upload your tables to MySQL. We present here two solutions:
You may alternatively want to search Google for tips on how to upload data to a MySQL server.
Main database creation
You may create a new database using the MIDOP MySQL manager, a built-in minimal tool that enables you explore, create and remove databases on your MySQL server.
The internal MySQL manager might cause irreversible damage to your data: please, use it with extreme care!
Alternatively you may create a database using "phpMyAdmin", an open source tool extremely reliable and complete.
Below a quick explanation on how to use it on Windows and Mac OSX in combination with pre-configured AMP stack.
If you use Linux, please, search Google on how to install phpMyAdmin on your system.
 Windows
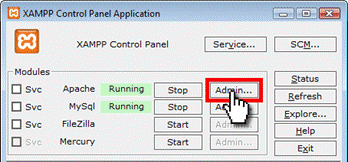
- Open the XAMPP online administration panel and click the “Admin” button corresponding to the Apache web server (Apache must be turned on):
- Select “phpMyAdmin” within the web interface panel:
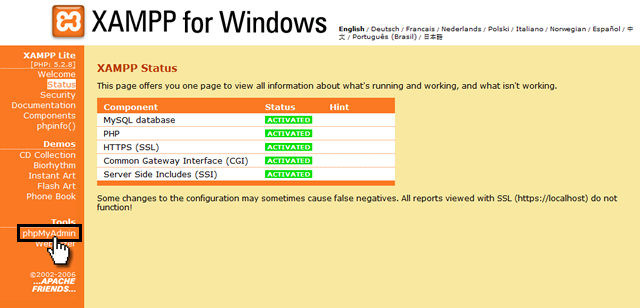
phpMyAdmin is a web tool written in PHP language that offers let you visually manage your MySql databases. By using it you will be able to create, modify and query both databases and tables and also upload and download your data content.
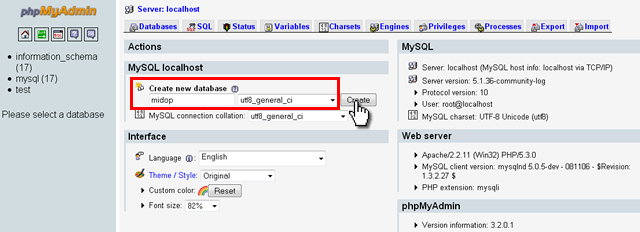
- In the phpMyAdmin window create a new database, for example called “midop” (lower case) and specify “utf8_general_ci” as a “collation” from the drop-down menu; think about databases as a folder: here you’ll be able to store all the data tables about a project;
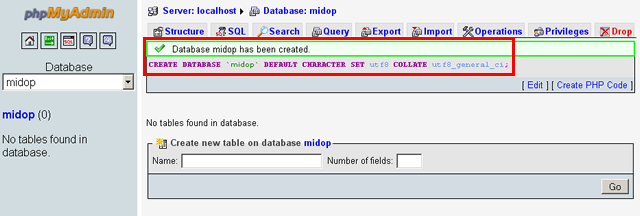
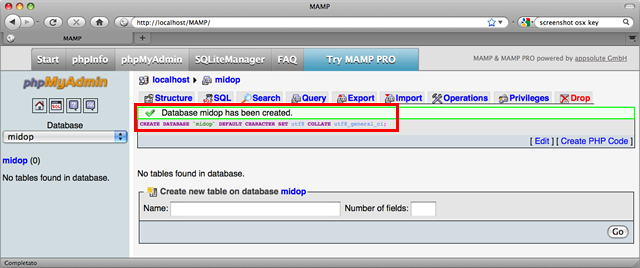
For every action requested by the user phpMyAdmin give a feedback message telling if the operation was successful or not. Below a screenshot showing a correctly created database:
 MacOS X
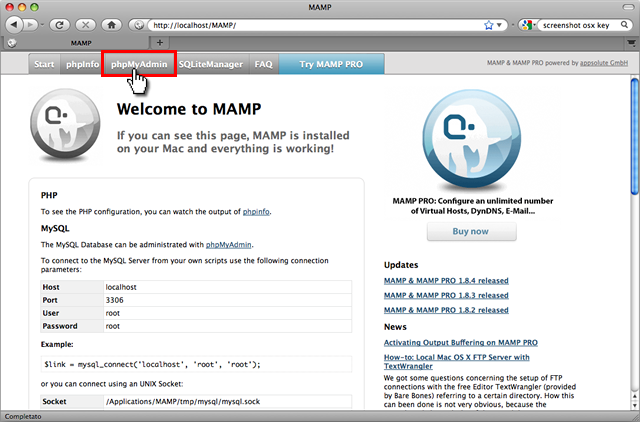
- In the MAMP window click on “Open start page”; a new browser window will appear and the MAMP web control panel interface will appear and shows up; click on “phpMyAdmin”:
- Proceed to the MySql administration interface:
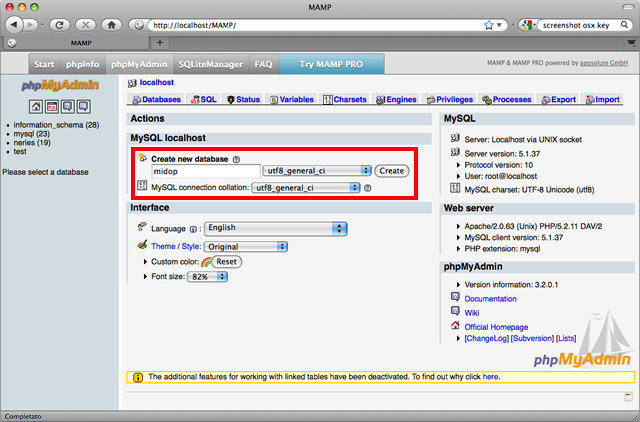
- Let’s create your first MySql database, for example enter “midop” (do NOT use upper case, spaces nor special characters) in the “Create a new database” field and specify “utf8_general_ci” as a “collation” from the drop-down menu, then click “create”. A feedback message will show up telling you if the requested operation successfully succeeded.
If you decide to alter/change/correct your data directly in MySql using phpMyAdmin we advice you to keep trace of all of them or you’ll end up with a data set which will not correspond to your initial data, resulting in odd situation later.
Data upload via CSV text file
- open the table that you want to load in MySql and do a bit of cleaning:
- if the first line is a header with the name of each column content, delete the entire row;
- in order to avoid the import of unwanted content delete some column and rows at the end of the table; apparently empty cells might contain spaces and they will be exported;
- • from the spreadsheet export a CSV file (“Comma Separated Value”) for each table; the output is a plain text file. The character used to delimit each field content depends on your operating system regional settings: in order to know which character is used open the exported CSV file using a standard text editor. Usually a semicolon or a comma character are used;
- turn on both your Apache and MySql server if needed;
- open a browser and surf to your phpMyAdmin folder;
- access your database (or create a new one);
- for each table that you want to import into MySql:
- create a new table containing a field for each column of your spreadsheet table;
- click on the “import” tab and load each of your CSV file;
- specify which character is used as field delimiter (“Fields terminated by”);
- check your imported data by clicking on the “Browse” tab;
Data upload using an ODBC link
This section covers the procedure on how to transfer a table from Microsoft Access to MySql using an ODBC, Open Database Connectivity (http://en.wikipedia.org/wiki/ODBC).
In order to let Access and MySql communicate directly, Windows need to know which driver must be used while transferring data; such database engine driver will transparently maps Access data into MySql and vice versa with just a couple of clicks.
 Windows
The MySql ODBC driver is freely available from the MySql website.
Before installing it, you should determine which is the right version for your system, the 32bit or the 64bit release.
Please, have a look at the page "Installing the MySql ODBC driver on Windows".
Before continue, check if the ODBC driver is properly installed and is available to Windows.
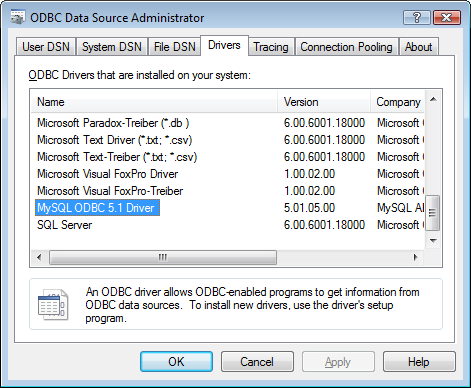
To do so, run the correct version of the "ODBC Data Source Administrator" for your system (see "Installing ODBC on Windows") and check the "Driver" tab.
The MySql ODBC driver should appear in the list, as shown in figure:
Now that the ODBC driver is properly installed, applications that are ODBC aware such Microsoft Access, can connect to MySql.
A series of links to different remote data servers can be created; creating these links is possible using a quick configuration procedure in the "ODBC Data Source Administrator".
Once a link to a remote server is created, you can then select such link in Access, and transparently load the remote data pretty much like loading data from a local file.
Procedure to create a ODBC link to a remote data server:
- Turn on the both Apache and the MySql server, if not already running;
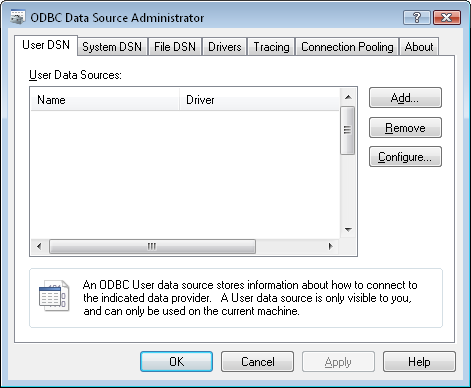
- To create an ODBC link to the database “midop” (as explained above), open the "ODBC Data Source Administrator".
-
Select the "User DSN" tab anc click "Add"
-
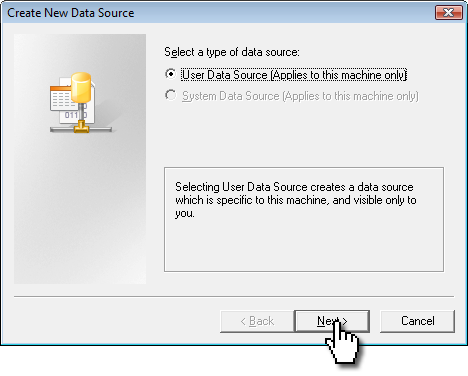
Select "User Data Source" and "Next"
-
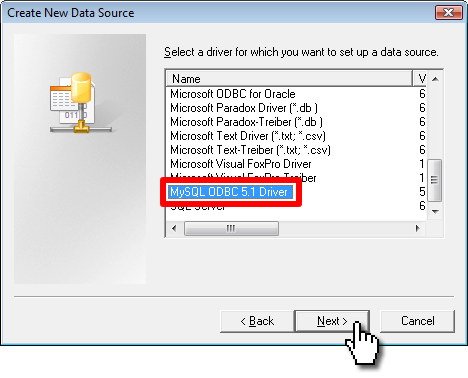
Select the MySql ODBC driver and "Next"
-
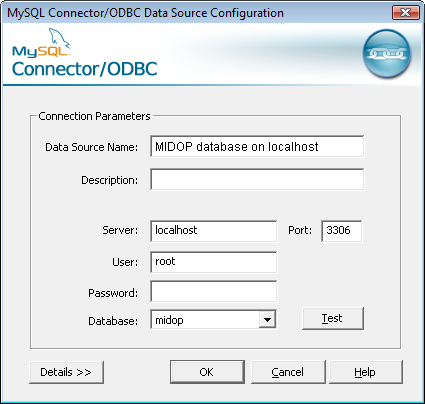
Enter:
- a meaningful data source name, as it will be later on used to identify the link from MS Access;
- the remote server hostname or IP address;
- the user name to login into the remote server (in XAMPP and WAMP the default user is "root");
- the password (in XAMPP and WAMP leaving it empty);
- click "test" to check if the connection can be established;
- click "OK";
From now on you will be able to connect to this data resource from every application ODBC enabled.
You are now ready to transfer data from Access and MySql with a couple of clicks.
Please, note that this connection works in both ways: you can export but also import data tables from MySql.
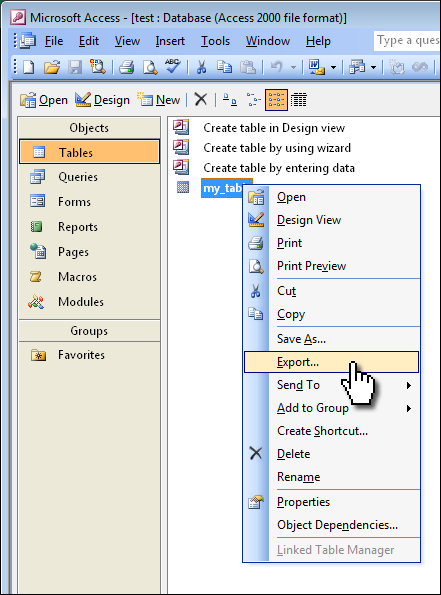
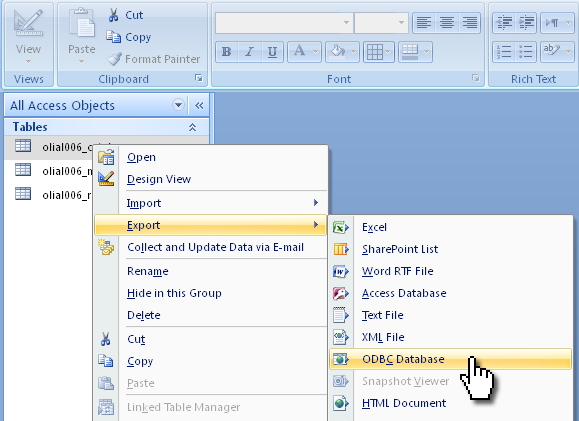
In order to export a table from Access to MySql follows these steps:
- In Access (left version 2003, right version 2007) right click on the table that you want to transfer to MySql:
- (only for Access 2003) scroll down the types on the export table dialogue and choose “ODBC Database”:
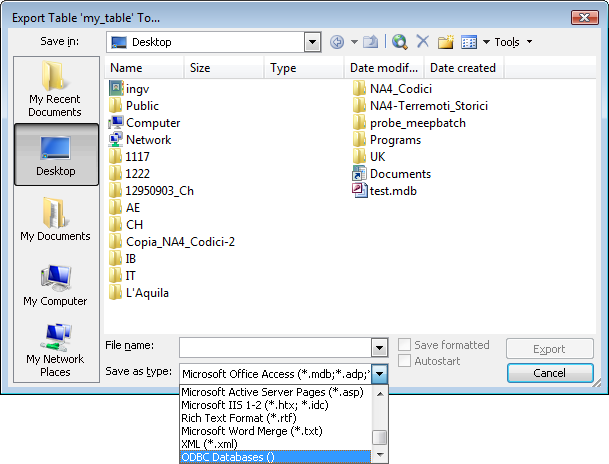
- Enter the name of the table that will be created in MySql. Note that you can also specify different a table name than what is used in for the Access table (you might have stored in your database various versions of the same table).

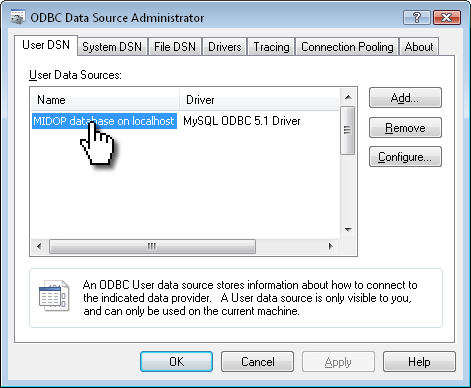
- Select the previously created ODBC data source connection then click “ok”:
The data transfer speed might depends on the table size and the type of connection to MySql (local, on the same computer or a remote connection).
That’s it: your table is now stored in MySql and will be available to MIDOP.
 MacOS X
- Download and install the MySql driver/connector from
http://dev.mysql.com/downloads/connector/odbc/5.1.html#macosx-dmg
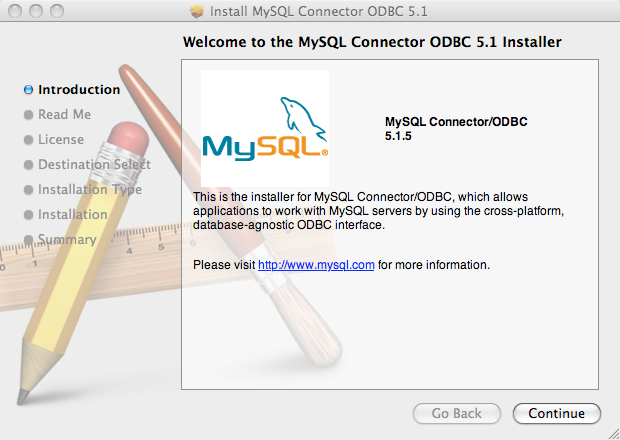
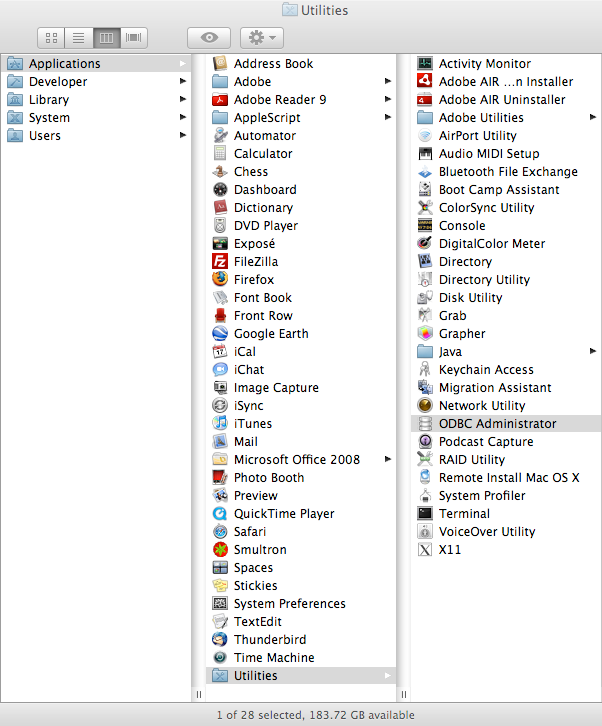
- Once the installation process has finished, open the ODBC control panel available in “Applications / Utilities / ODBC Administrator”
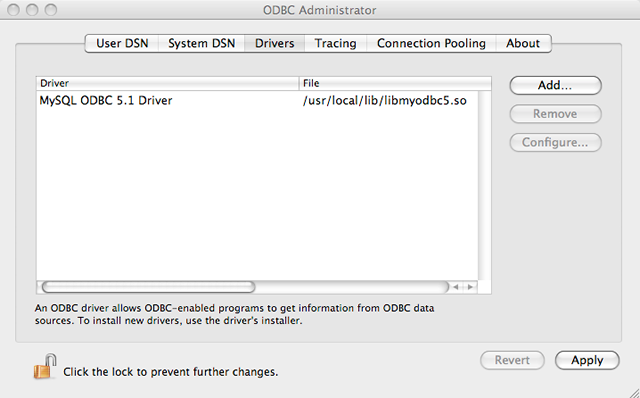
- Check if the MySql driver is available to the system by opening the “Drivers” tab:
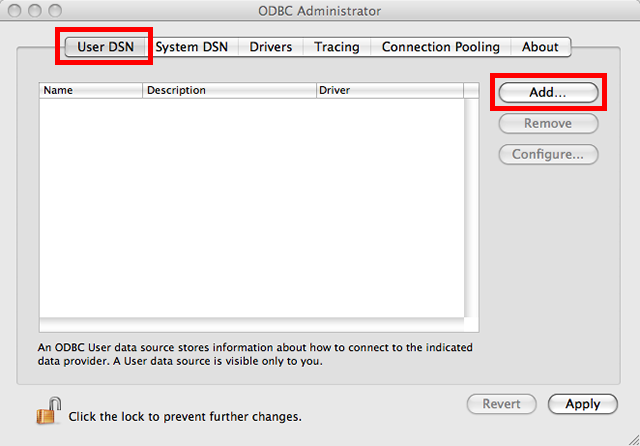
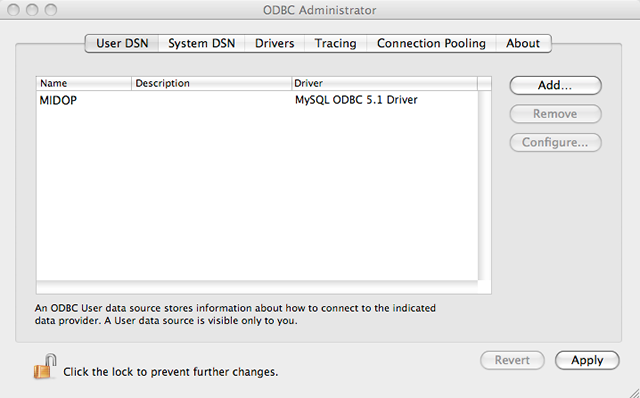
- Add a new ODBC connection in the “User DNS” (User Data Source Name) tab that from now on you will use in order to transfer data to and from the selected data source:
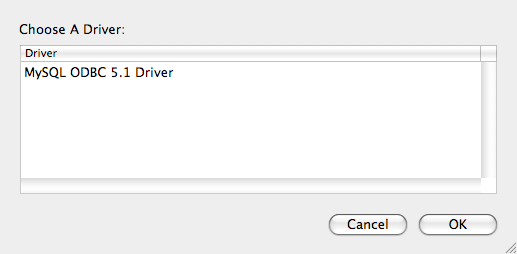
- Select the appropriate driver used by the ODBC connection:
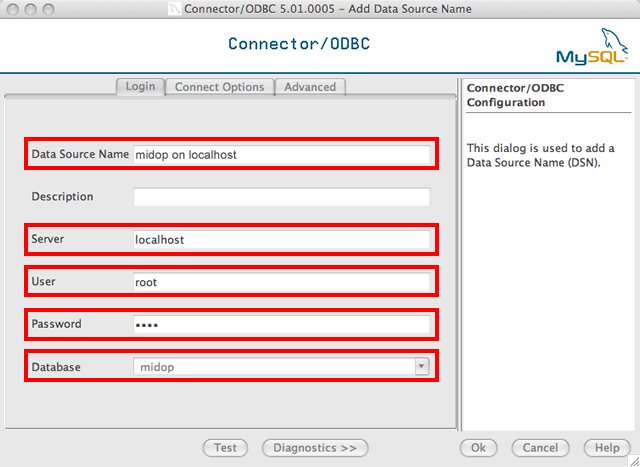
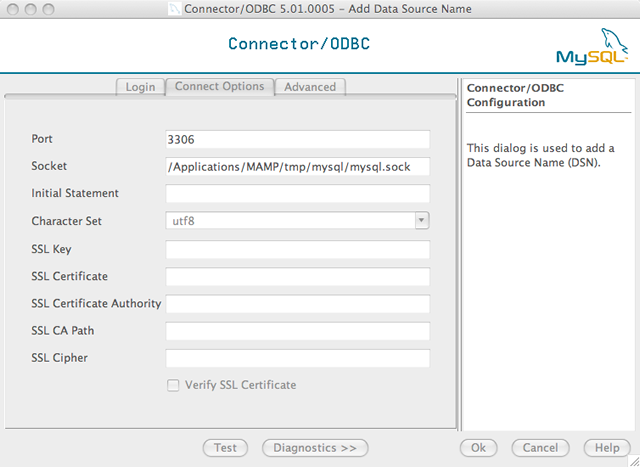
- Insert the name of the ODBC connection (something that will help you later remember where the connection is pointing to, for example “midop on localhost”), the server name “localhost”, the user name and the password in order to connect to your MySql server; in the “Connect Options” tab insert “3306” as the port number and “Applications/MAMP/tmp/mysql/mysql.sock” as the used socket:
- Save your ODBC connection.
Create an OpenOffice Base file that is connected to MySql follow this procedure:
- open OpenOffice Base and select to connect to an existing database via ODBC:
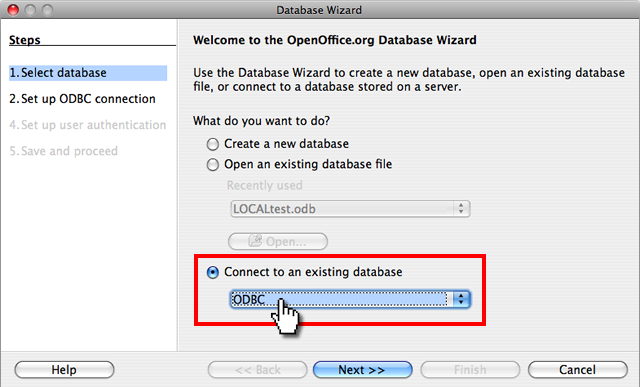
- selected the previously stored ODBC connection “midop on localhost”:
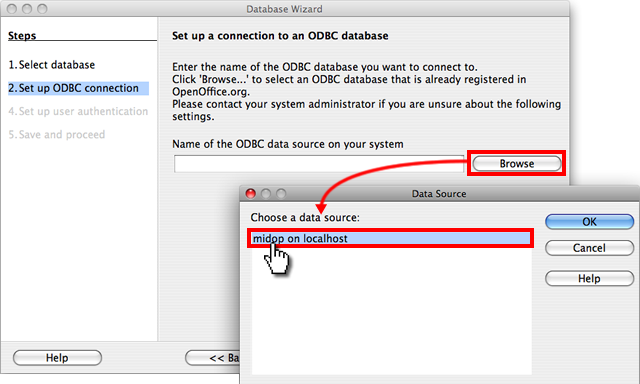
- enter the required MySql server authentication parameters (username and password):
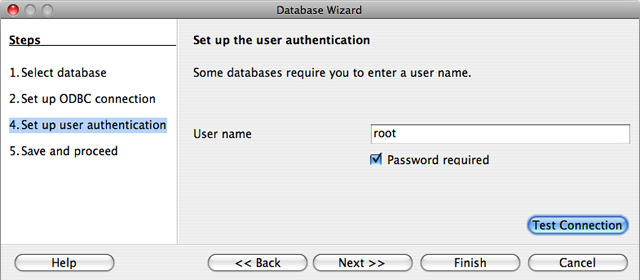
- register the database connection into OpenOffice and open the created file:
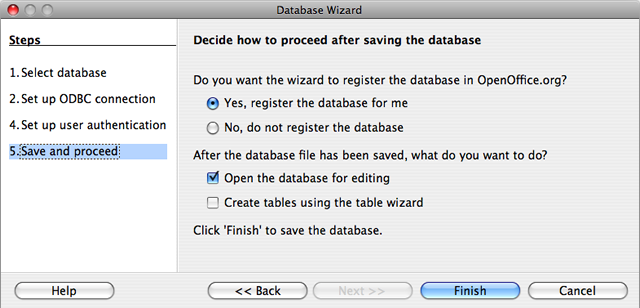
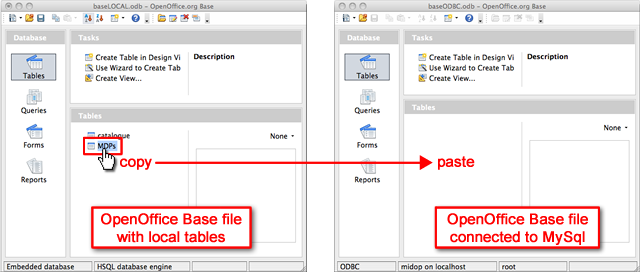
To copy a table from a OpenOffice Base to MySql database you require two different OpenOffice Base files:
- a Base file with your locally stored tables;
- a Base file connected to MySql server (created above).
As OpenOffice Base cannot manage local and linked tables within the same Base file you must follow this procedure in order to copy a table to MySql:
- open both the OpenOffice Base file containing your local stored tables and the above created Base file connected to MySql then copy and paste (as a “Data source table”) the table between the two Base files:
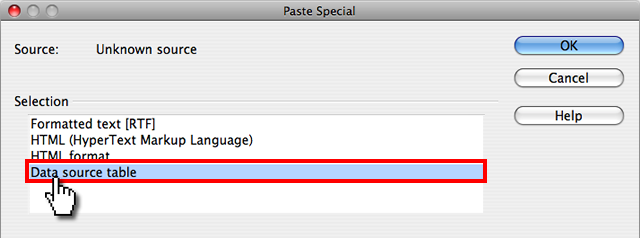
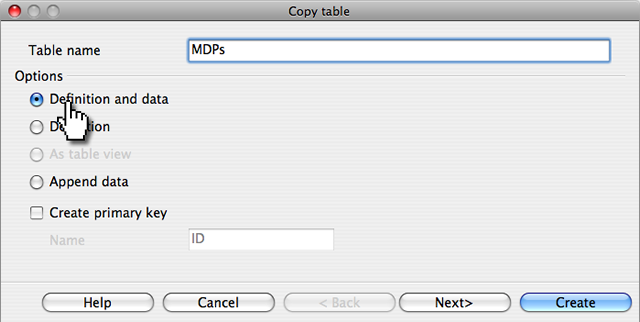
- once you paste a table into the destination OpenOffice Base file a requester appear asking to define what to copy, select “Definition and data”:
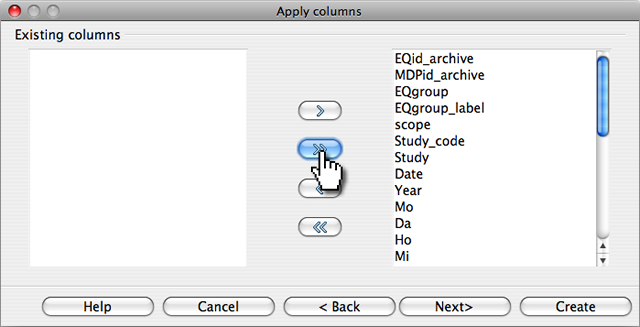
- OpenOffice will now ask which columns must be copied, select all the fields by pressing the double arrow:
For more information on OpenOffice Base usage refer to:
http://wiki.services.openoffice.org/wiki/Database
Your “midop” database in the MySql server contains now your data table and the MIDOP package can now use your data.
 Linux (Ubuntu)
In order to use OpenOffice Base with MySql tables, the ODBC (“Open Database Connectivity”, http://en.wikipedia.org/wiki/ODBC) system drivers must be installed.
- install these three packages entering the following command in a terminal:
sudo apt-get install unixodbc libmyodbc unixodbc-bin - launch the ODBC configuration tool with:
sudo ODBCConfig - click the “System DNS” tab and click the “Add” button;
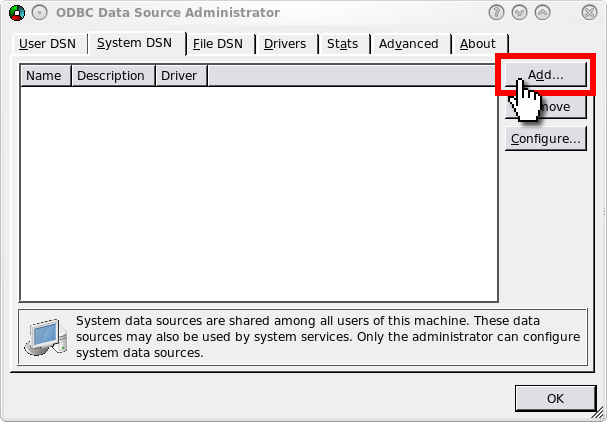
- click “Add” again to create a new ODBC driver;
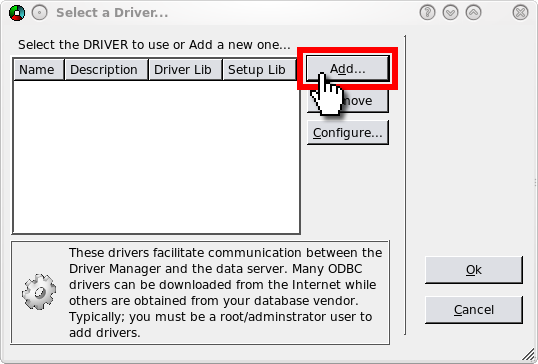
- in the “Driver Properties” window enter a label representing the new driver and its description using the appropriate fields;
- enter the path to the libmyodbc.so file in the Driver field ("/usr/lib/odbc/libmyodbc.so");
- enter the path to the libodbcmyS.so file in the Setup field ("/usr/lib/odbc/libodbcmyS.so");
- the final result should look like the figure;
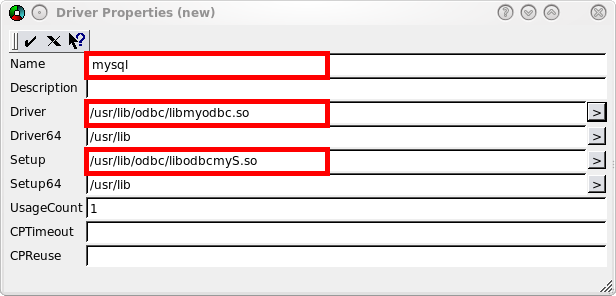
- click the Save and Exit button to save the settings;
- click OK to open the “Data Source Properties” window;
- give the new data source a name, enter its description, then specify the MySql server address, the database name, and port;
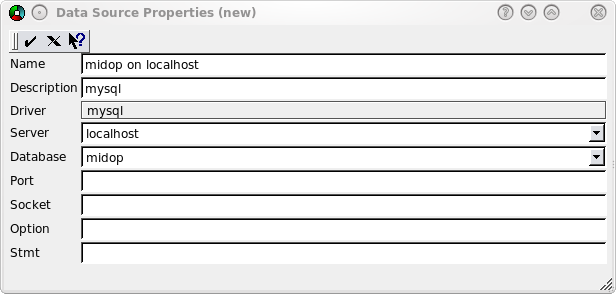
- click OK; from now on you can access the midop database from every software capable ODBC aware such as OpenOffice.
In order to use OpenOffice as a front-end for your MySql database follow these steps:
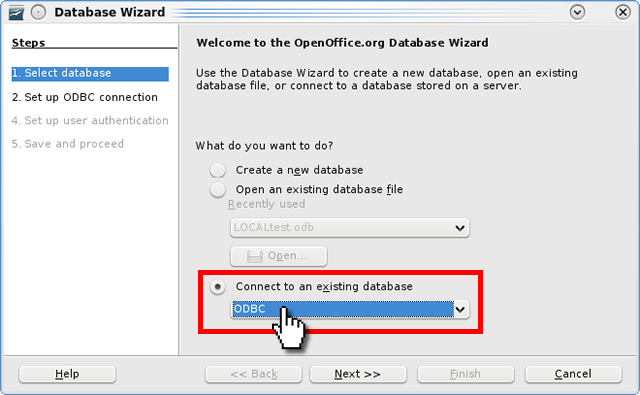
- select “ODBC” as data source:
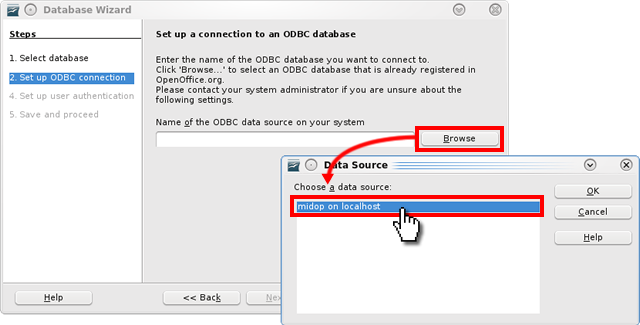
- select which data source must be used:
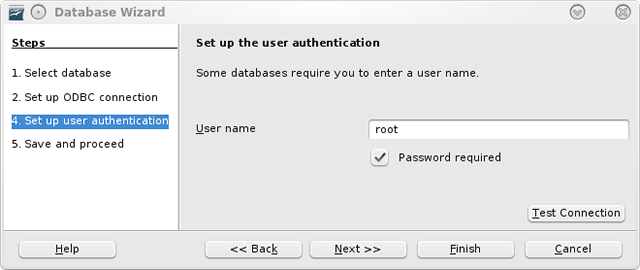
- enter the MySql access parameters (username and password):
The procedure for copying a table from OpenOffice Base local tables to MySql is the same as the Mac OSX procedure described above.


